Forensic Logical Acquisition of Apple Silicon Mac
As the Apple Silicon Mac devices become increasingly prevalent, understanding the unique challenges posed by these devices in digital forensics is paramount. By delving into the process of forensic acquisition of storage data, this post introduces the ASLA (Apple Silicon Logical Acquisition) script designed to facilitate and perform, whenever possible, the logical acquisition of Apple Silicon Macs. Remember that (till now) in case of Apple Silicon Macs enabled with FileVault encryption, you must know the password in order to perform the acquisition.
If you are eager to get started with the logical acquisition of Apple Silicon Macs, you can skip the first part about the main challenges with Apple Silicon and immediately get hands-on experience with the Apple Silicon Logical Acquisition.

Main Challenges in Logical Acquisition of Apple Silicon Macs
Apple announced its plan to transition from Intel processors to Apple Silicon (using the ARM architecture) on Mac Devices at WWDC 2020 on June 22, 2020. In late 2020, Apple Silicon was introduced in certain models and finished its transition away from Intel’s chip in 2023, so at this point all the new Mac devices are based on Apple Silicon.
The introduction of Apple Silicon in Mac devices has posed several challenges in digital forensics, especially in relation to the forensic acquisition of storage data. Basically, the main challenges are related to:
- No brute-force password attack technique yet known due to hardware-level protections.
- Inability to access the soldered storage as a device with the share disk mode.
Hardware-level protections against brute force
While the hardware-level encryption was already introduced in late 2017 on Intel-based Macs with the T2 security chip, Apple Silicon has further improved the level of protection within Mac devices so that, at the moment, there is no known solution to enable a brute-force attack against the password when FileVault is enabled.
Following the jailbreak of T2 chip using Checkra1n, in February 2022, a company has started offering a software solution that can bypass the brute-force mitigation protections on a T2 chip, enabling (slow) online brute-force attacks against the password. This solution cannot be used for Apple Silicon, for which there are yet no known solutions to bypass and/or mitigate password protections.
Share Disk Mode
Prior to Apple Silicon, there was the possibility to transfer files between two Mac devices using the target disk mode, so that the drive of a Mac device started in target disk mode and connected via USB or Thunderbolt to another Mac appears as an external drive. From the forensic perspective, this means that the target disk mode enabled on a Mac provides another Mac connected to it with physical access to the disk and the possibility to acquire it “as a device”.
With Apple Silicon, the target disk mode is no longer available on Mac devices. To transfer files from an Apple Silicon Mac device to another Mac, you can now leverage the share disk mode or mac sharing mode, which turns the system into an SMB file sharing server, providing another Mac device connected to it only with file-level access to user data. Therefore, it is not possible creating a proper forensic image of an Apple Silicon Mac, but only performing a logical acquisition of the shared disk, assuming that the password is not needed or is known by the forensic examiner, by relying on a tool which copies the file contents from source to destination.
Apple Silicon Logical Acquisition
The ASLA script is a bash script designed to facilitate the forensically-sound logical acquisition of data from Apple Silicon Mac devices. ASLA is a simple bash script, structured in functions, written with a focus on maintaining read-only access to data, which provides a streamlined solution for collecting data from Apple Silicon Macs. With interactive prompts and detailed logging, ASLA ensures a reliable and transparent acquisition process suitable for forensic activities and data analysis. It also provides the possibility to run in assisted mode, to help you in identifying the targeted Apple Silicon Mac started in share disk mode and connected to your Mac device, used for the acquisition.
The procedure of performing the logical acquisition is described using the following terminology:
- Host: the Mac device used for the acquisition, where the script is executed.
- Target: the Mac device to be acquired, started in share disk mode.
Sharing the Disk of the Target
Sharing the disk of an Apple Silicon Mac device (i.e., share disk mode) is a crucial step in performing the logical acquisition. While the procedure is officially documented by Apple, there are certain nuances and tricks, based on practical experience, that can streamline the process and mitigate potential challenges. This section will provide comprehensive instructions to effectively enable share disk mode on Apple Silicon Mac devices. By following these steps, you can confidently initiate the share disk mode and proceed with the logical acquisition:
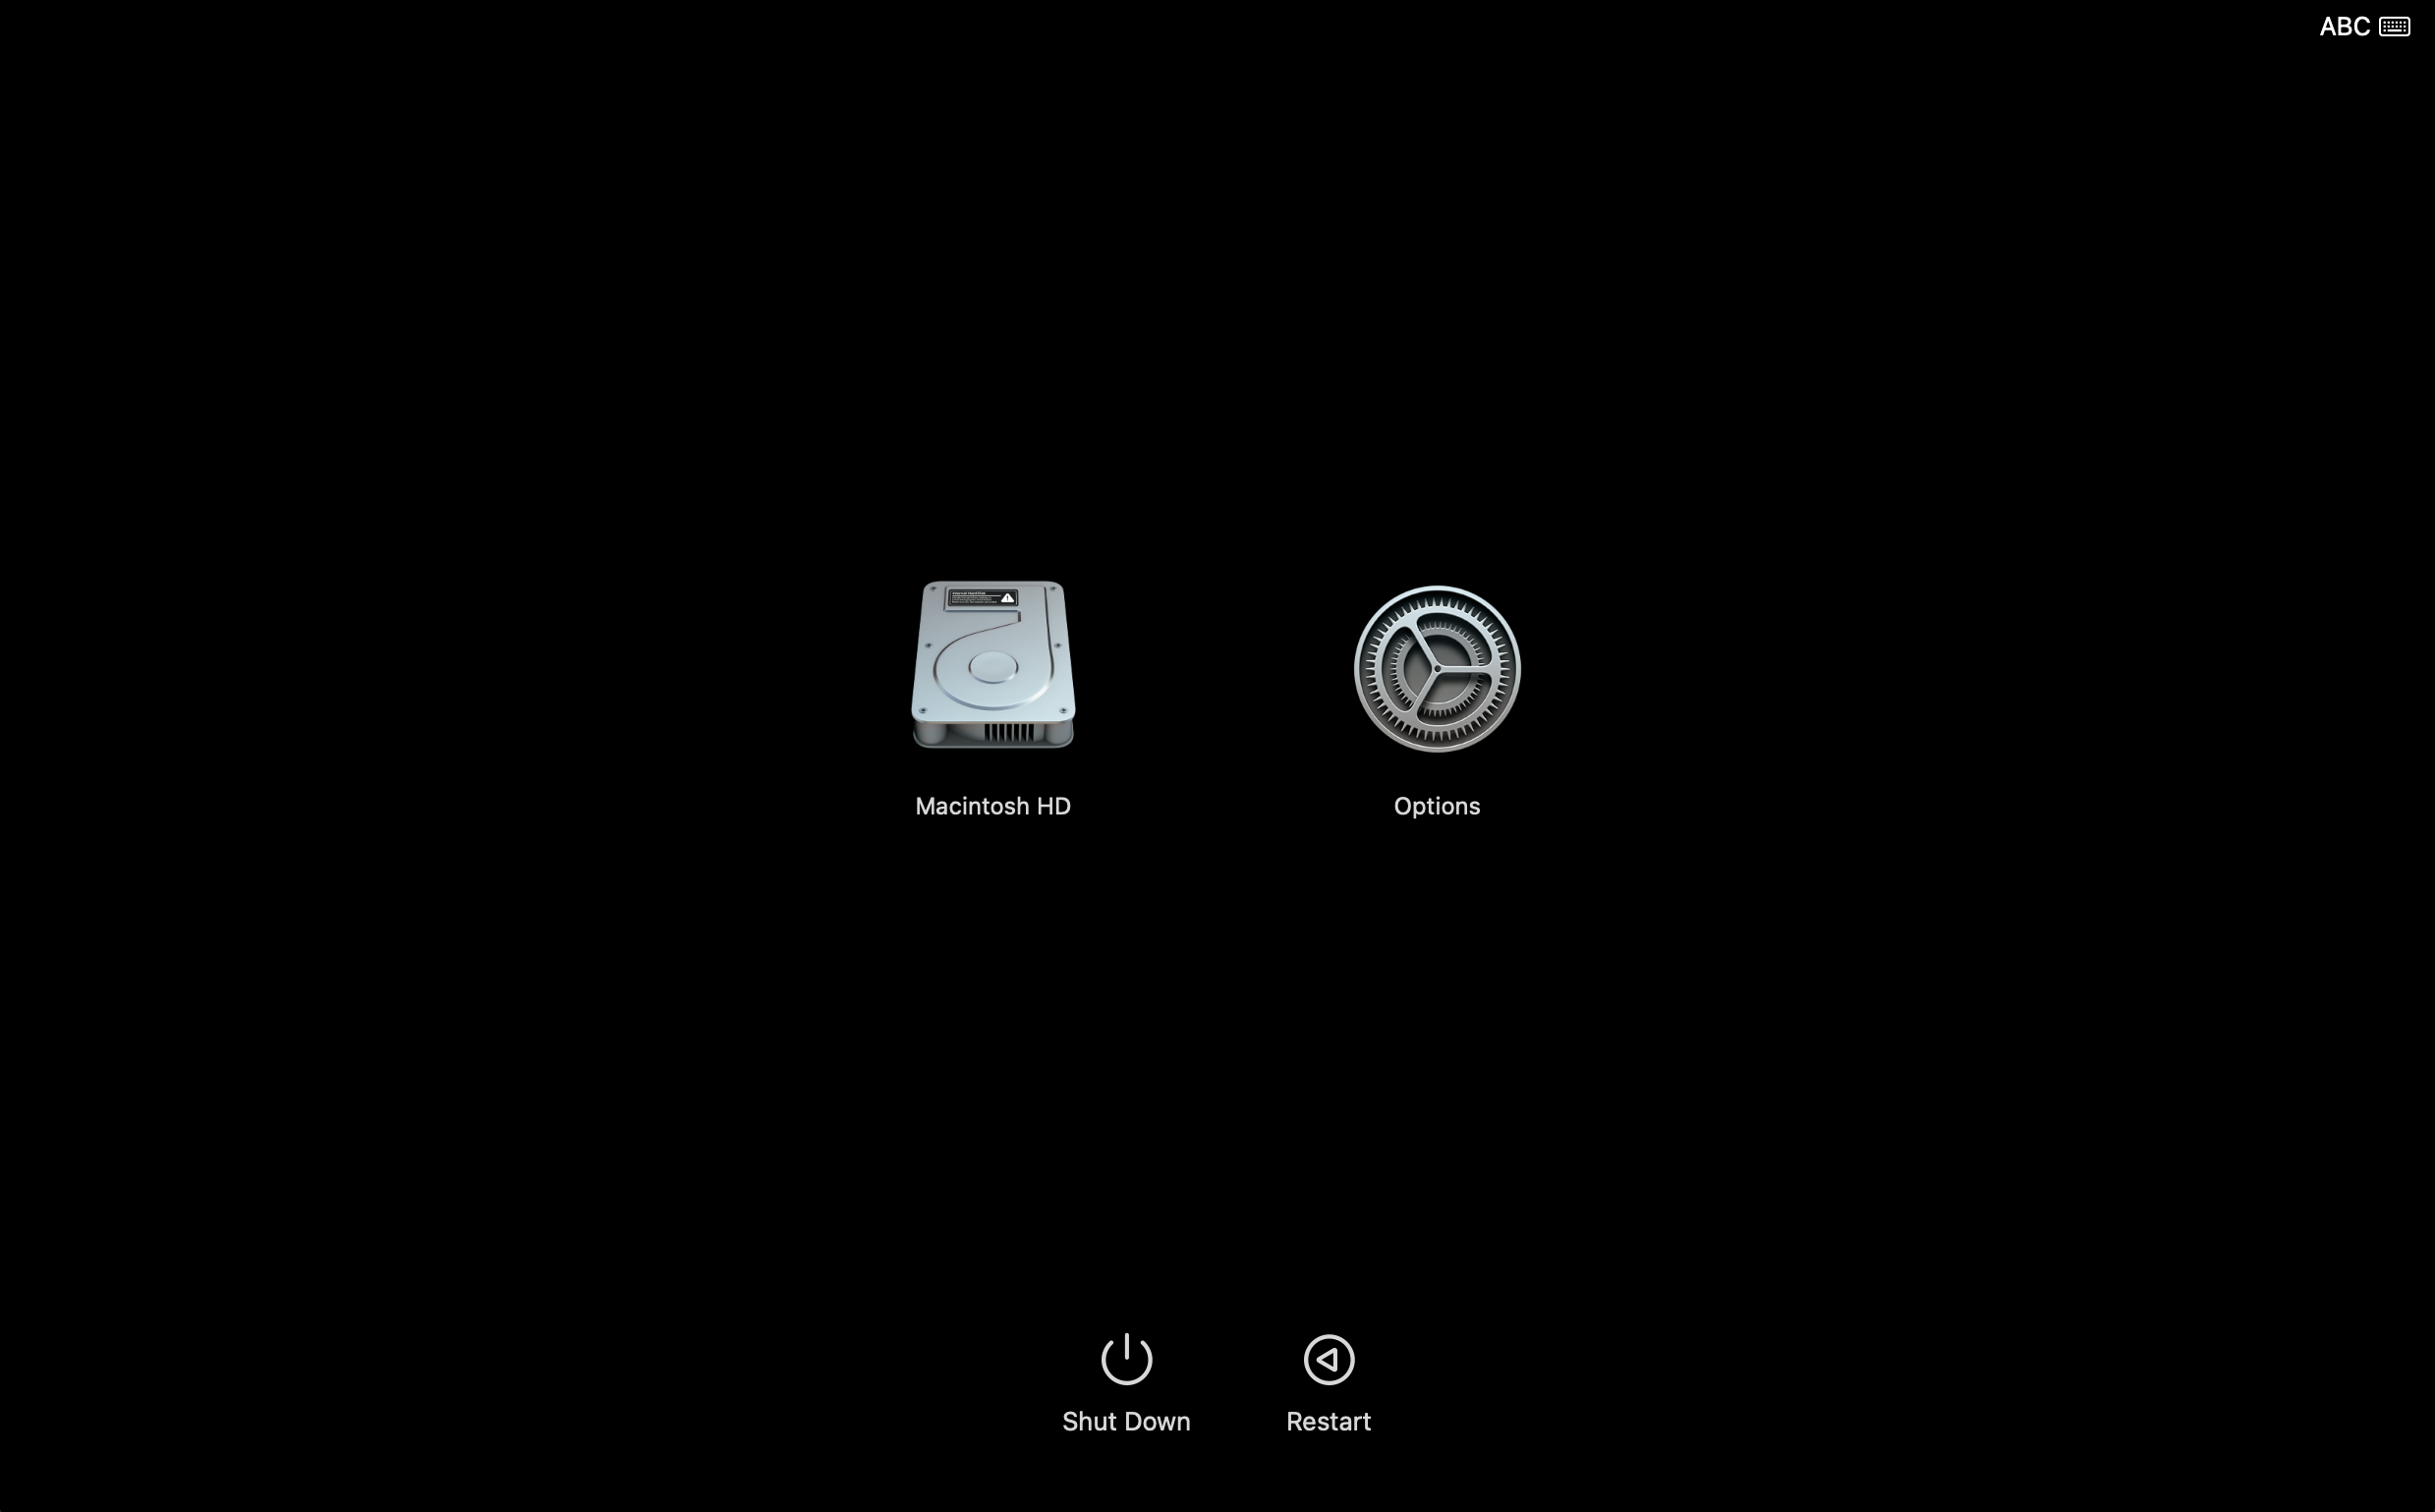
- The target must be started in Recovery Mode (press and hold power button until “Loading startup options” appears).
-
Selecting Options opens macOS Recovery.
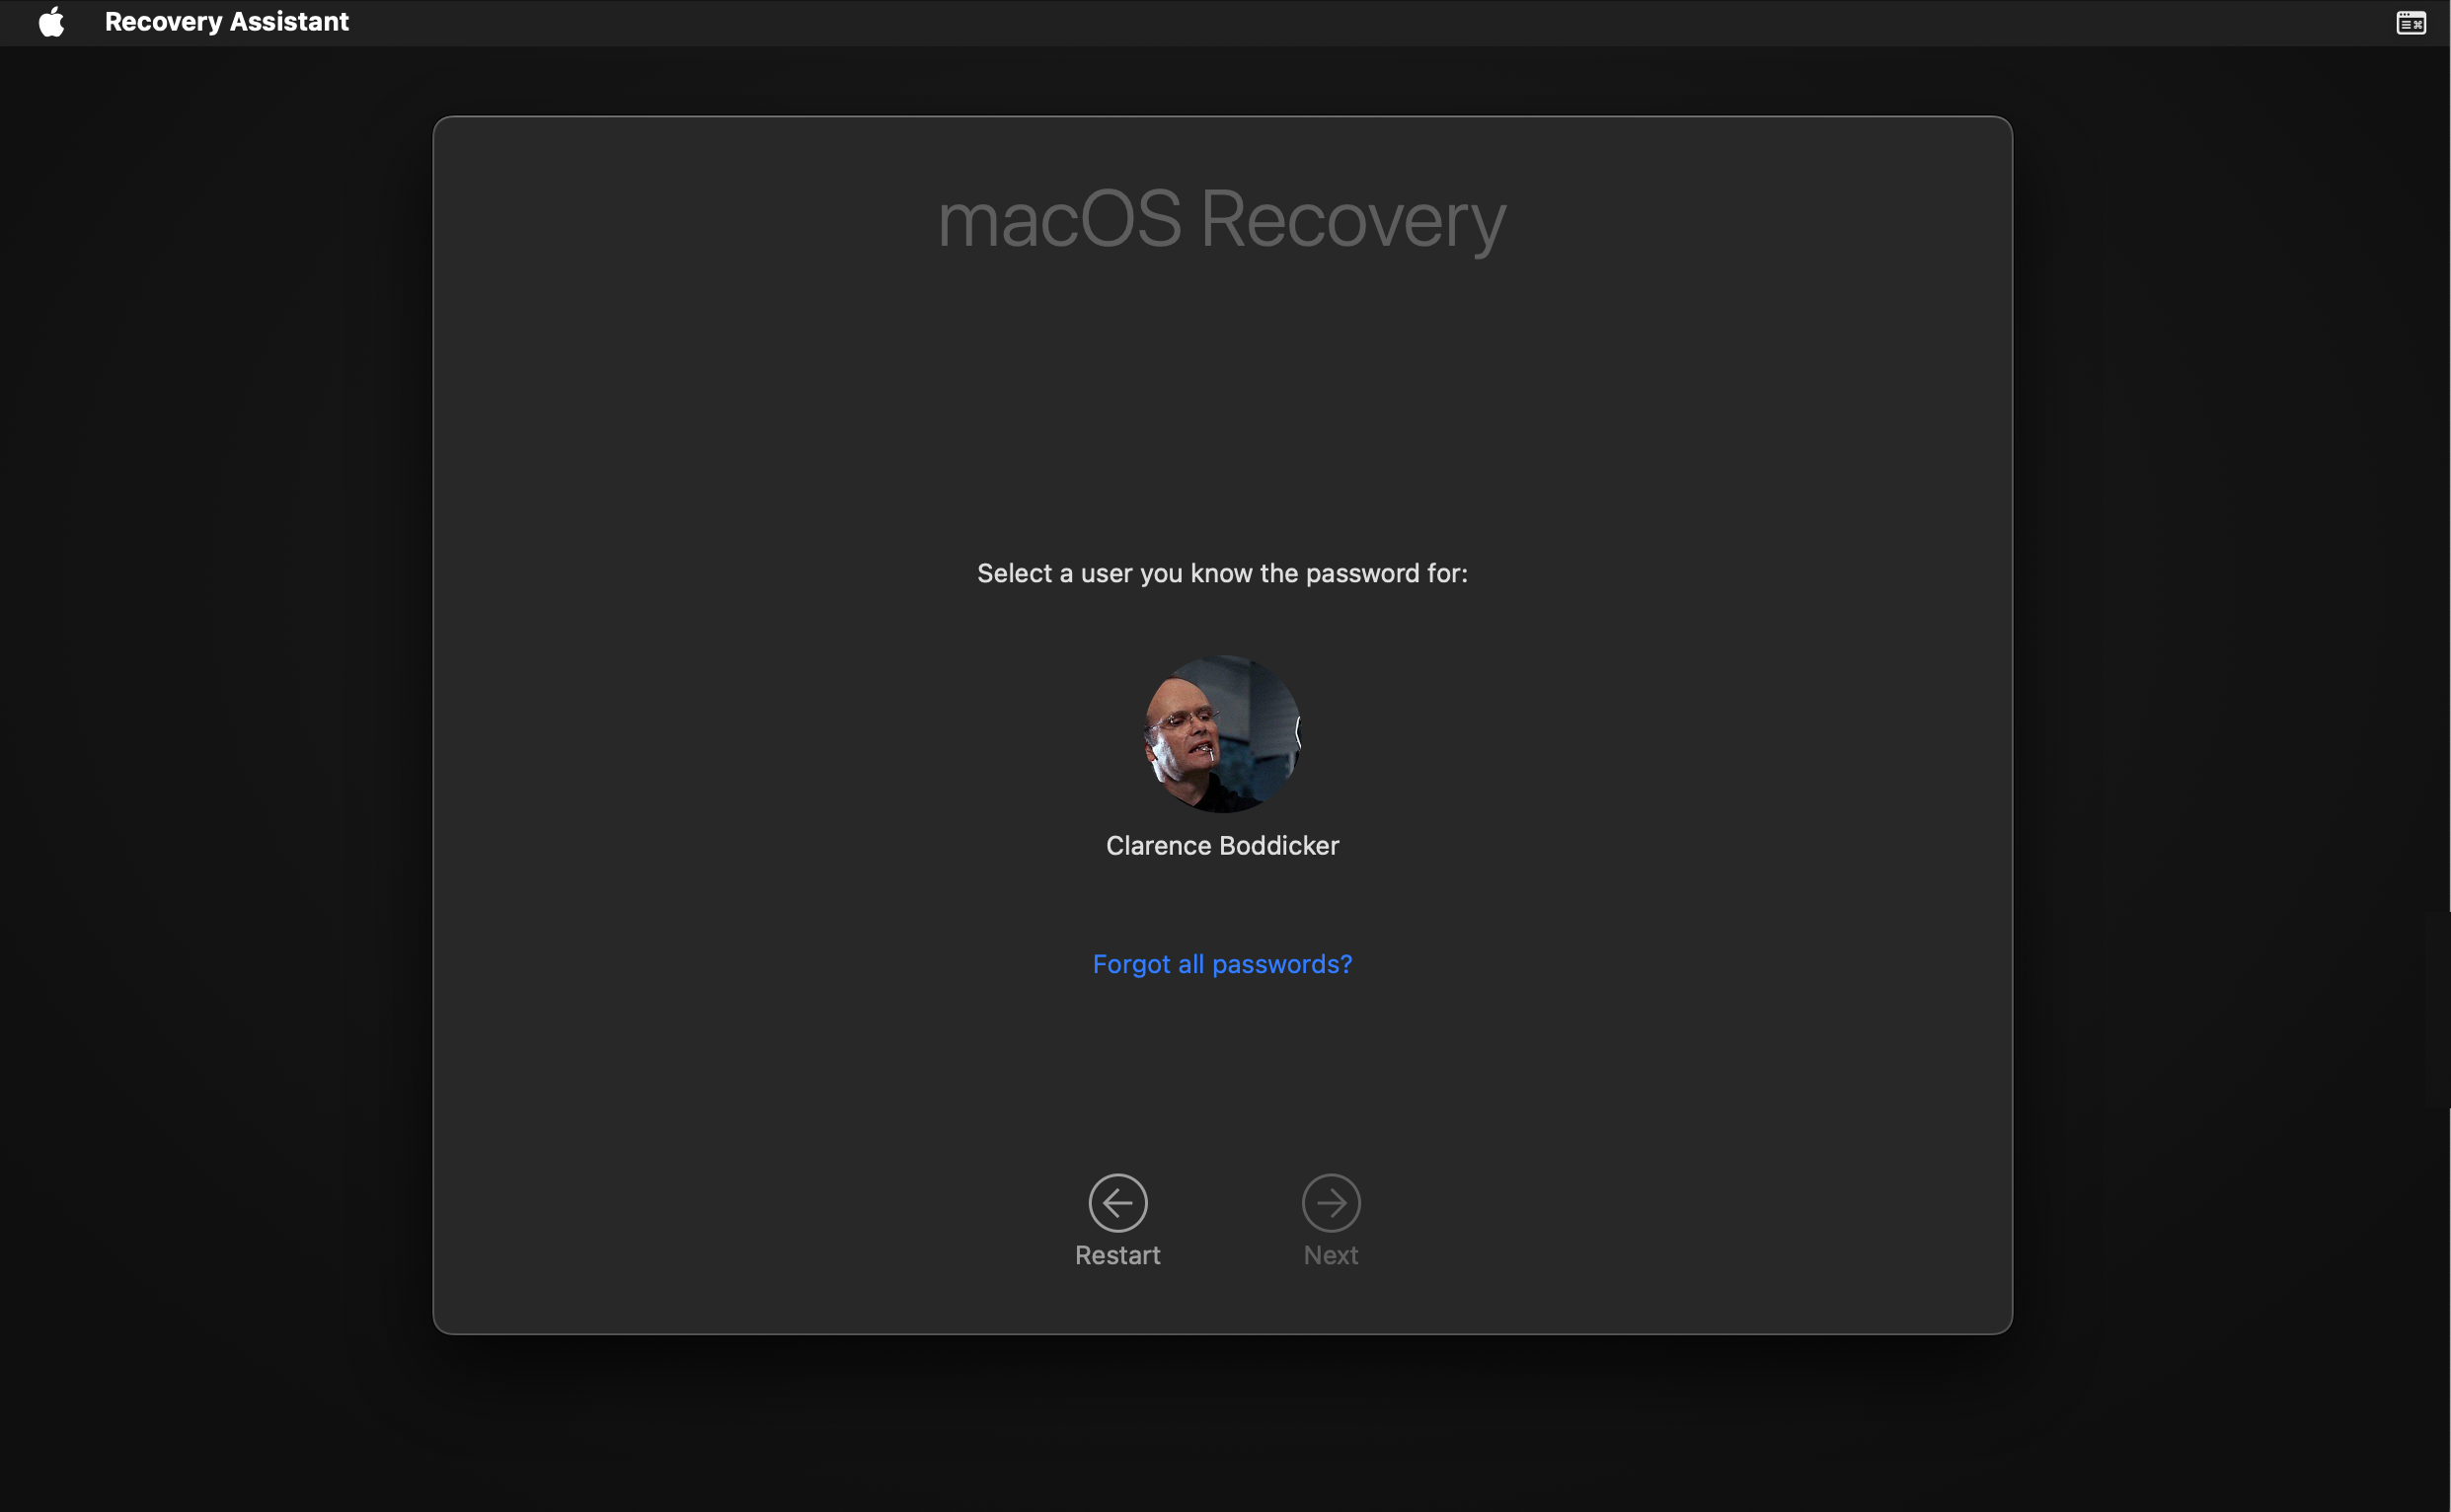
-
If requested, select a user and enter the password for.

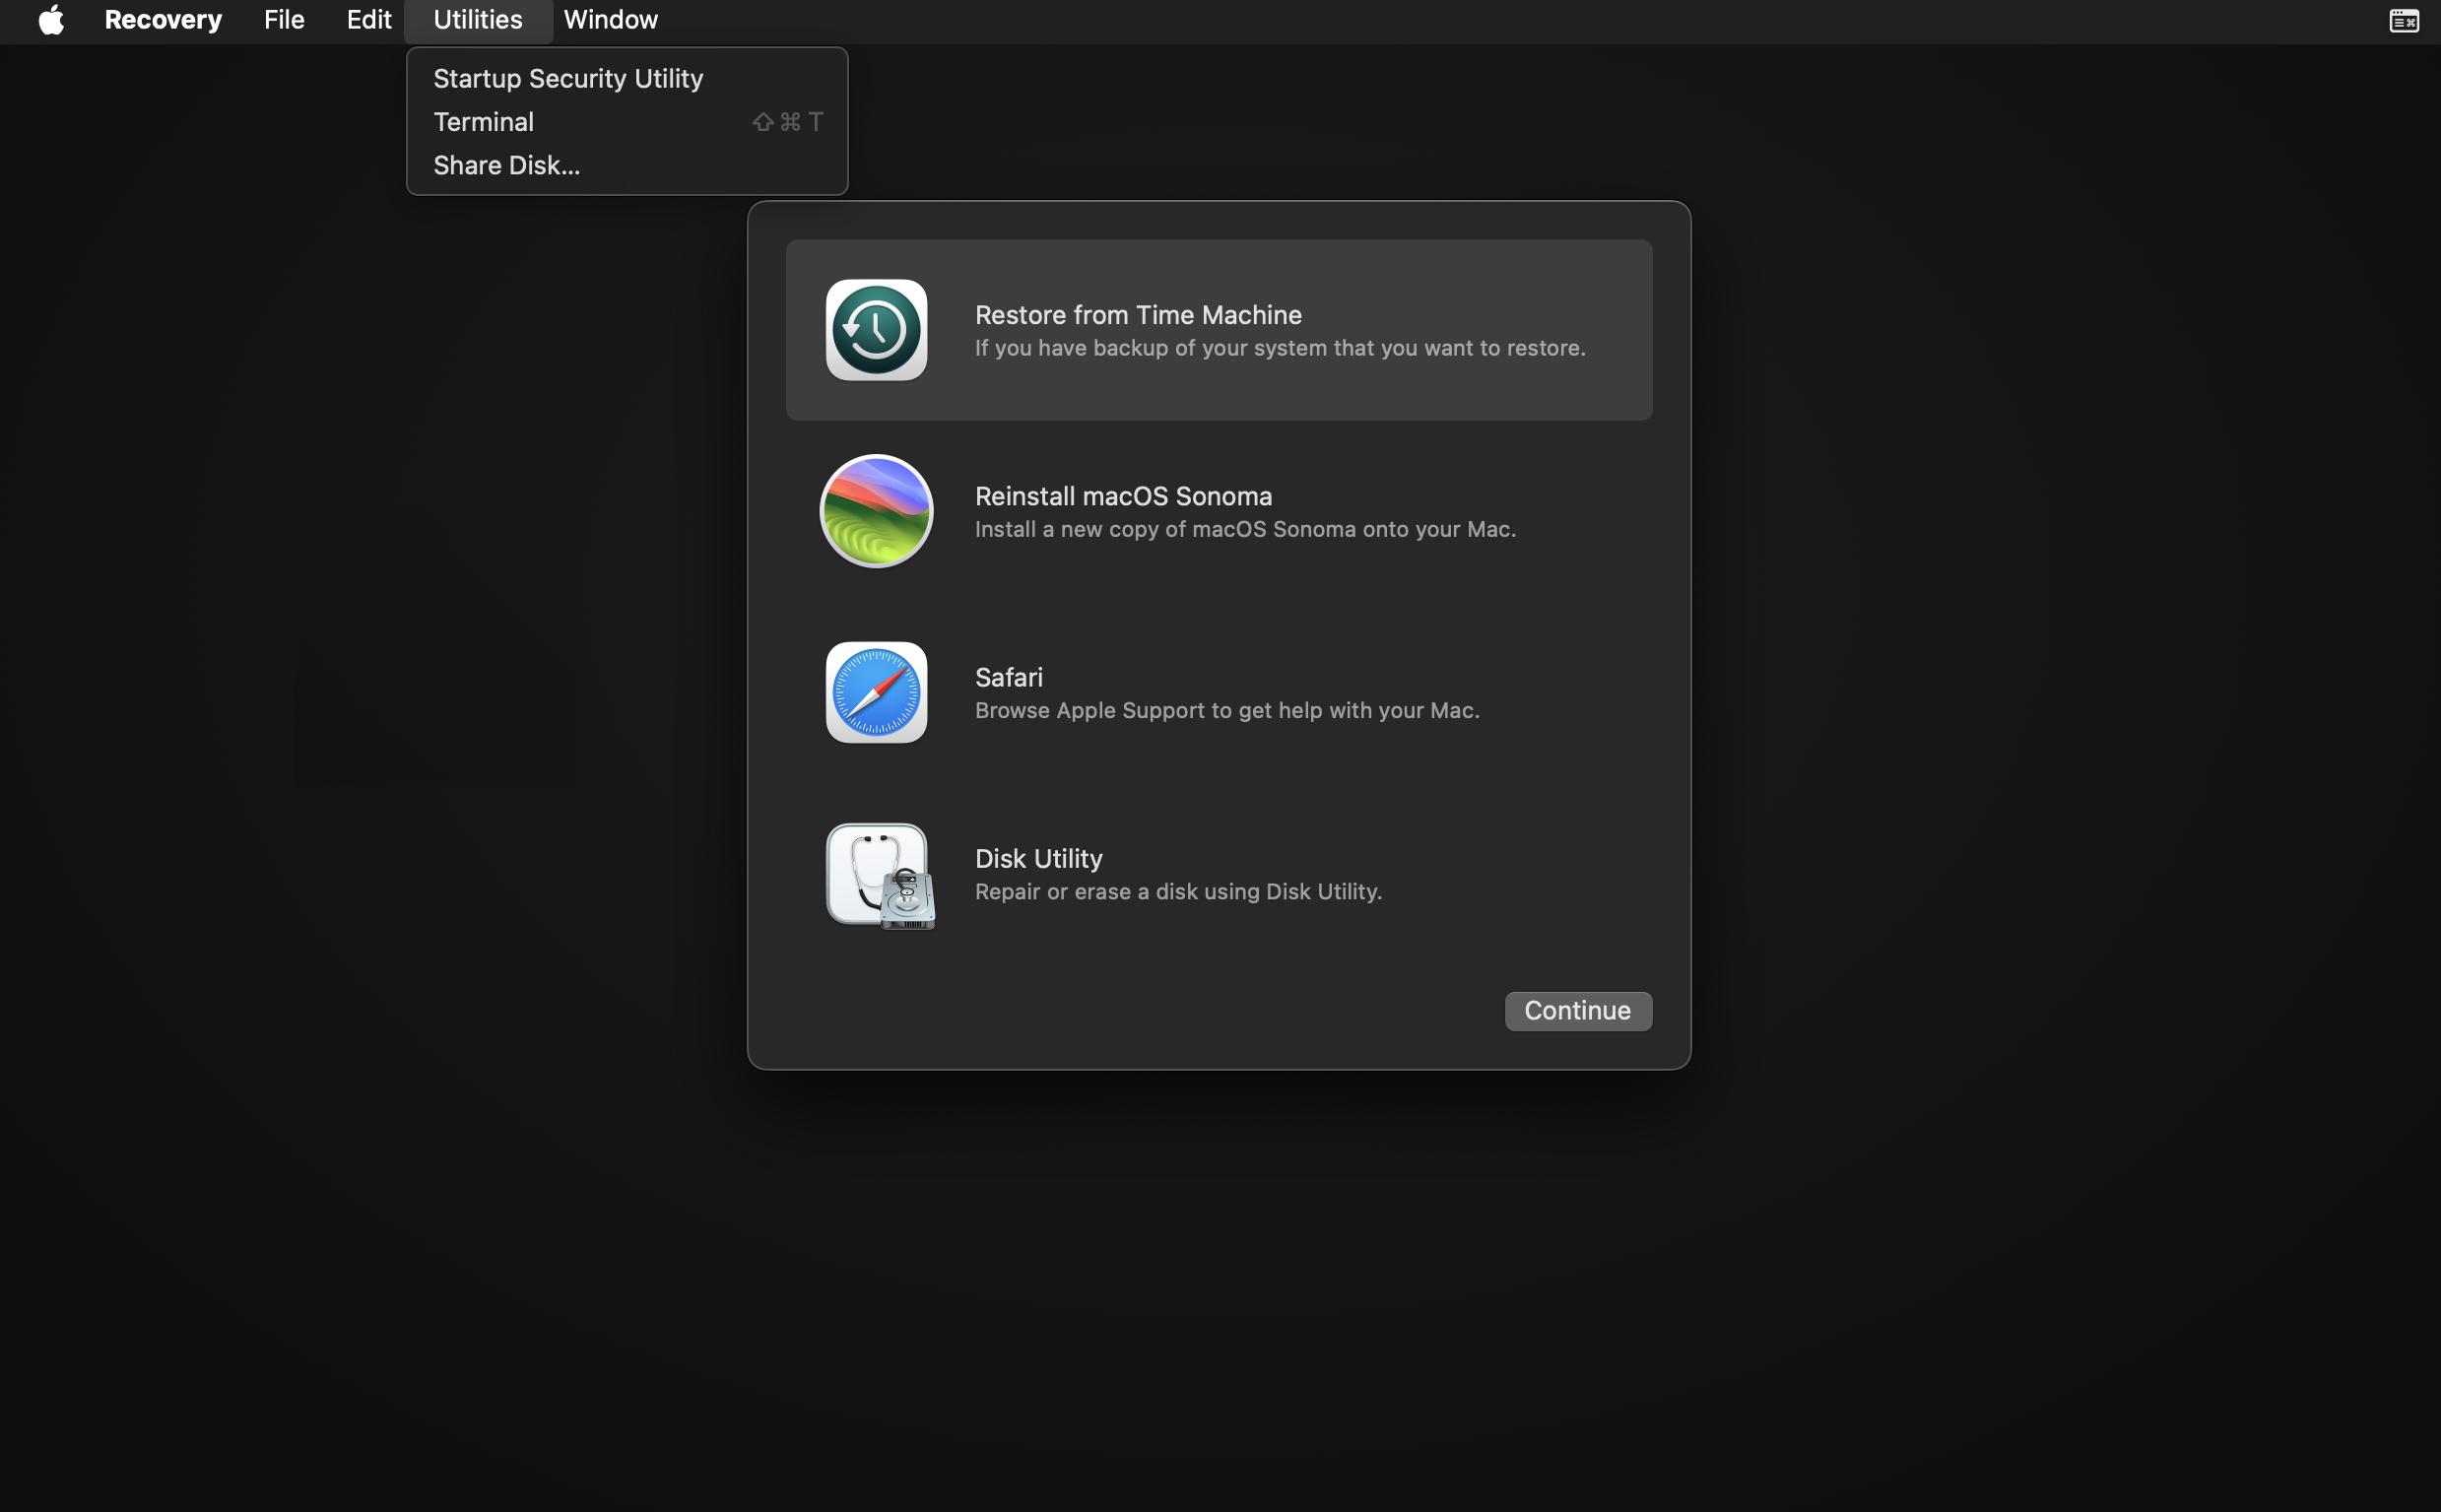
-
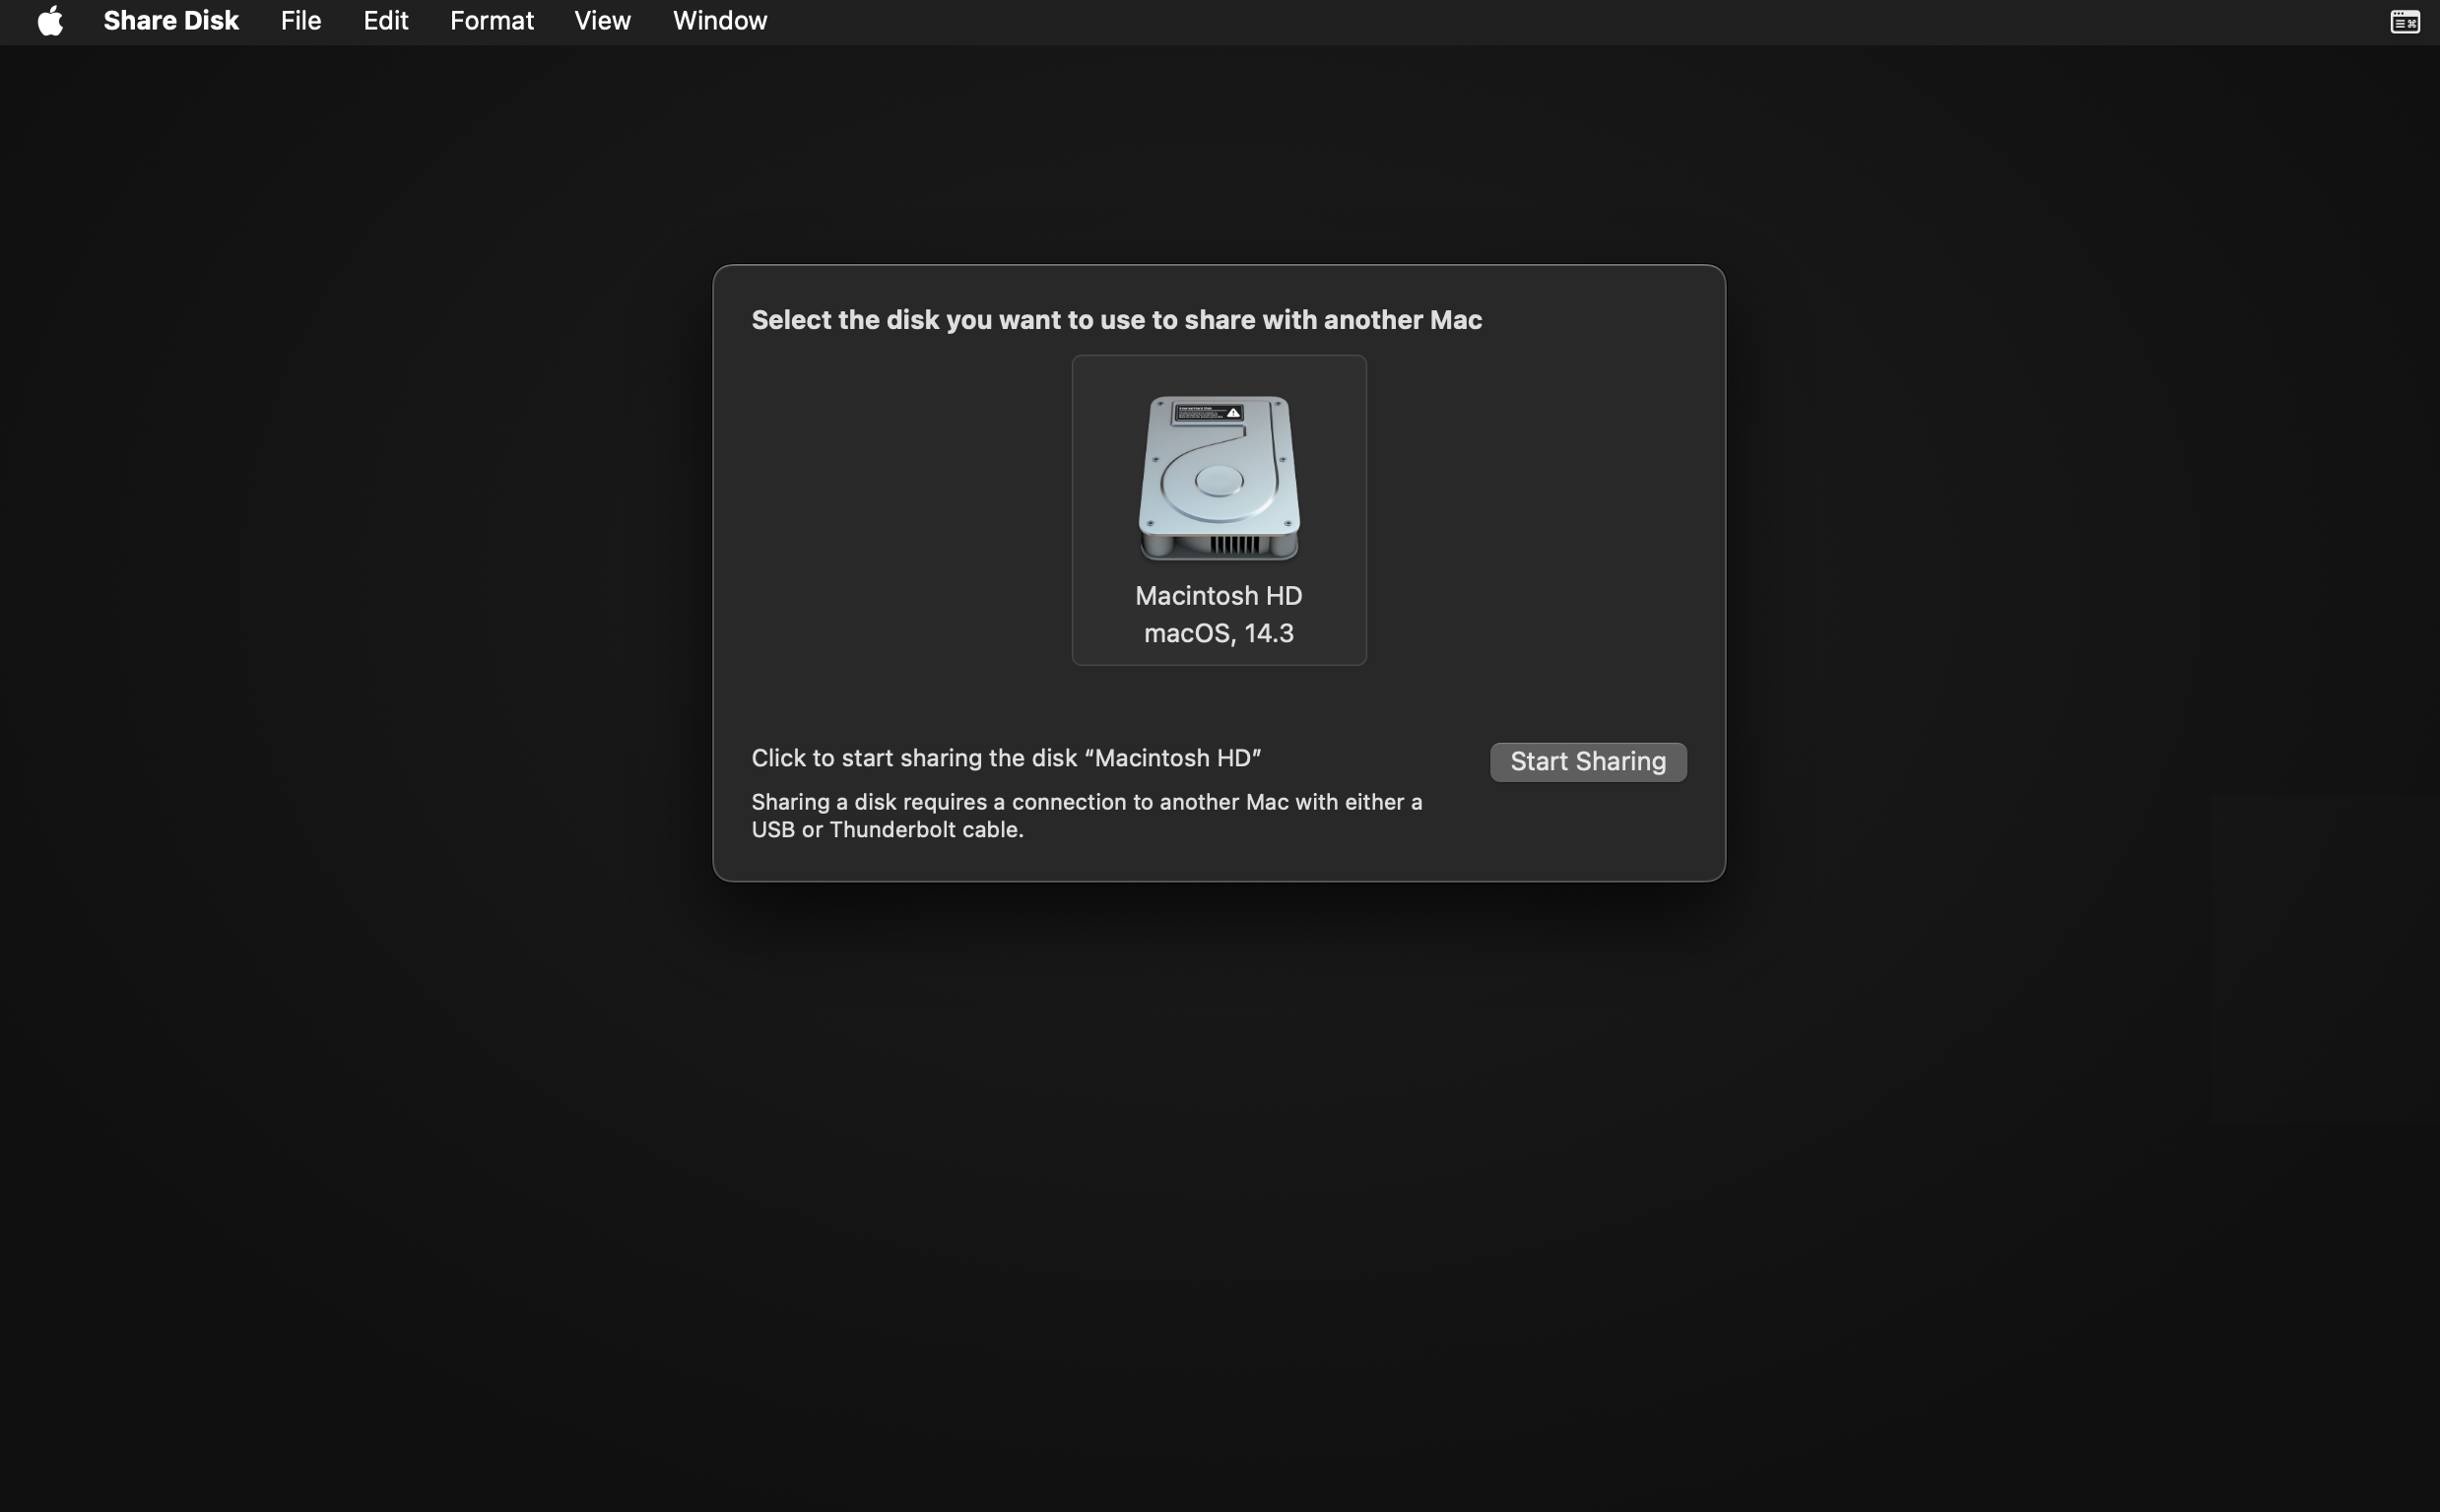
Once Recovery Mode starts, from the menu on the top, select Utilities > Share Disk to start sharing.
-
Select the disk that you want to share. If the disk is locked with File Vault, it must be unlocked by entering the password.
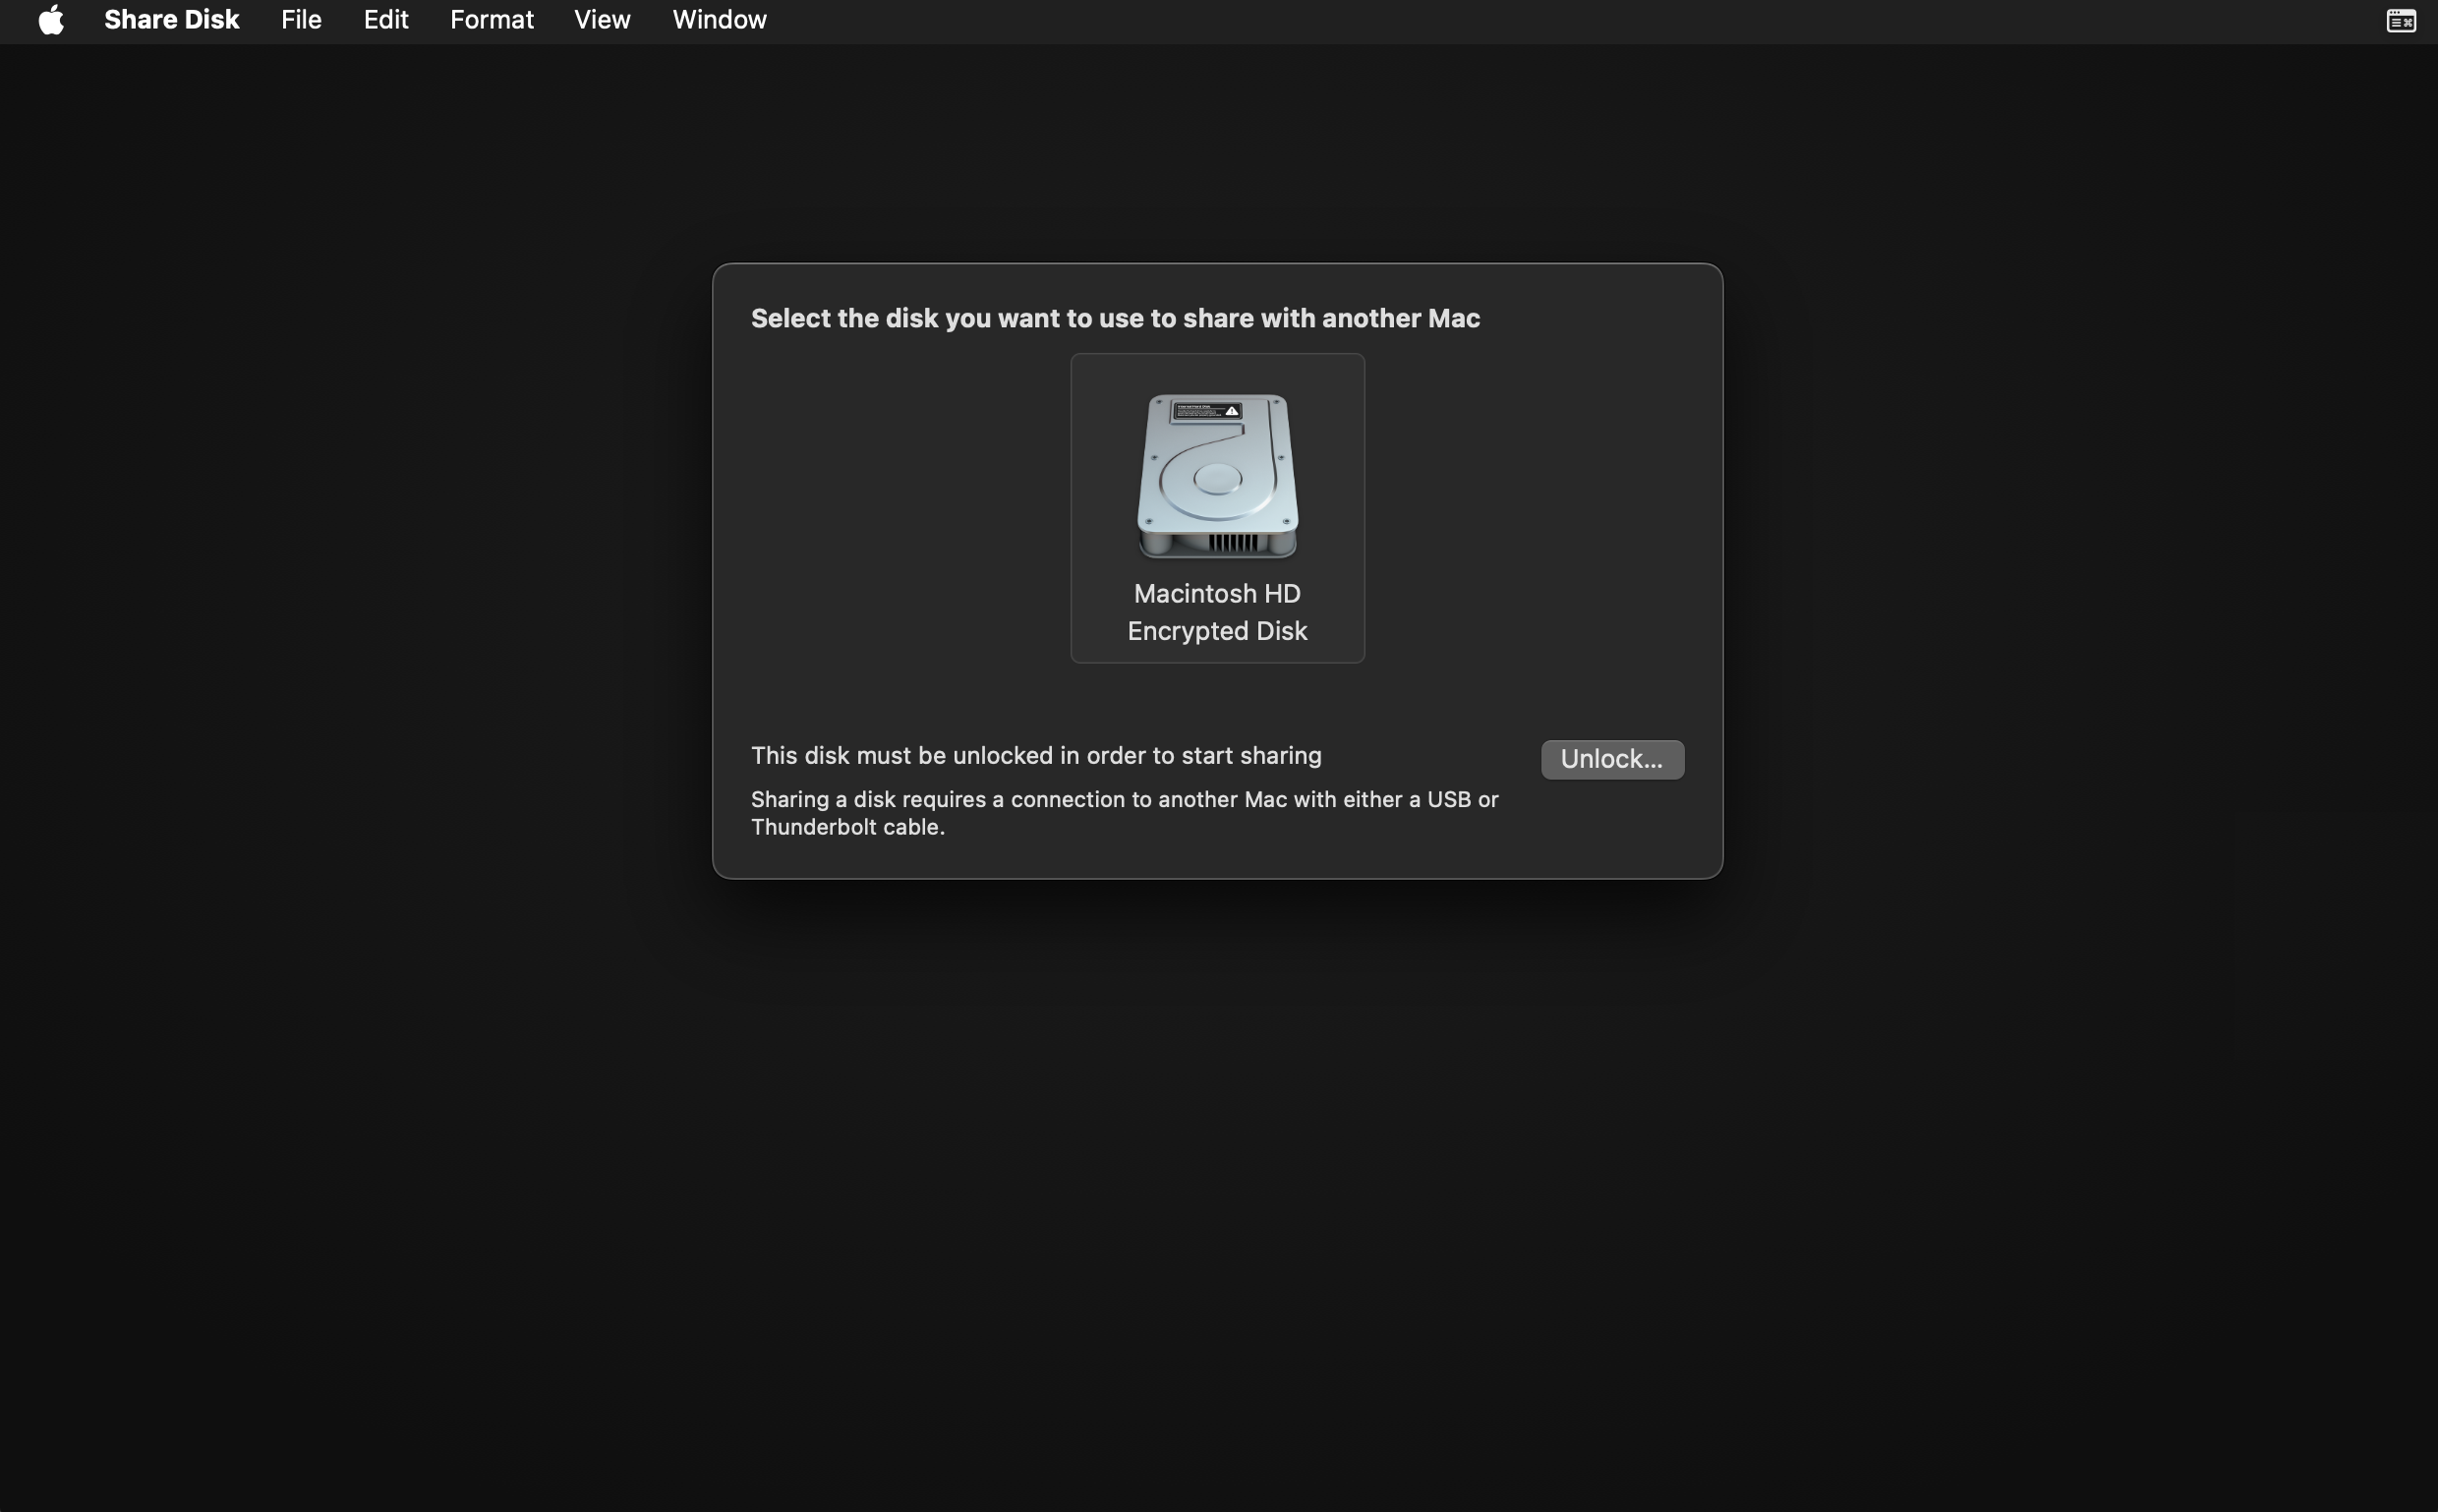
-
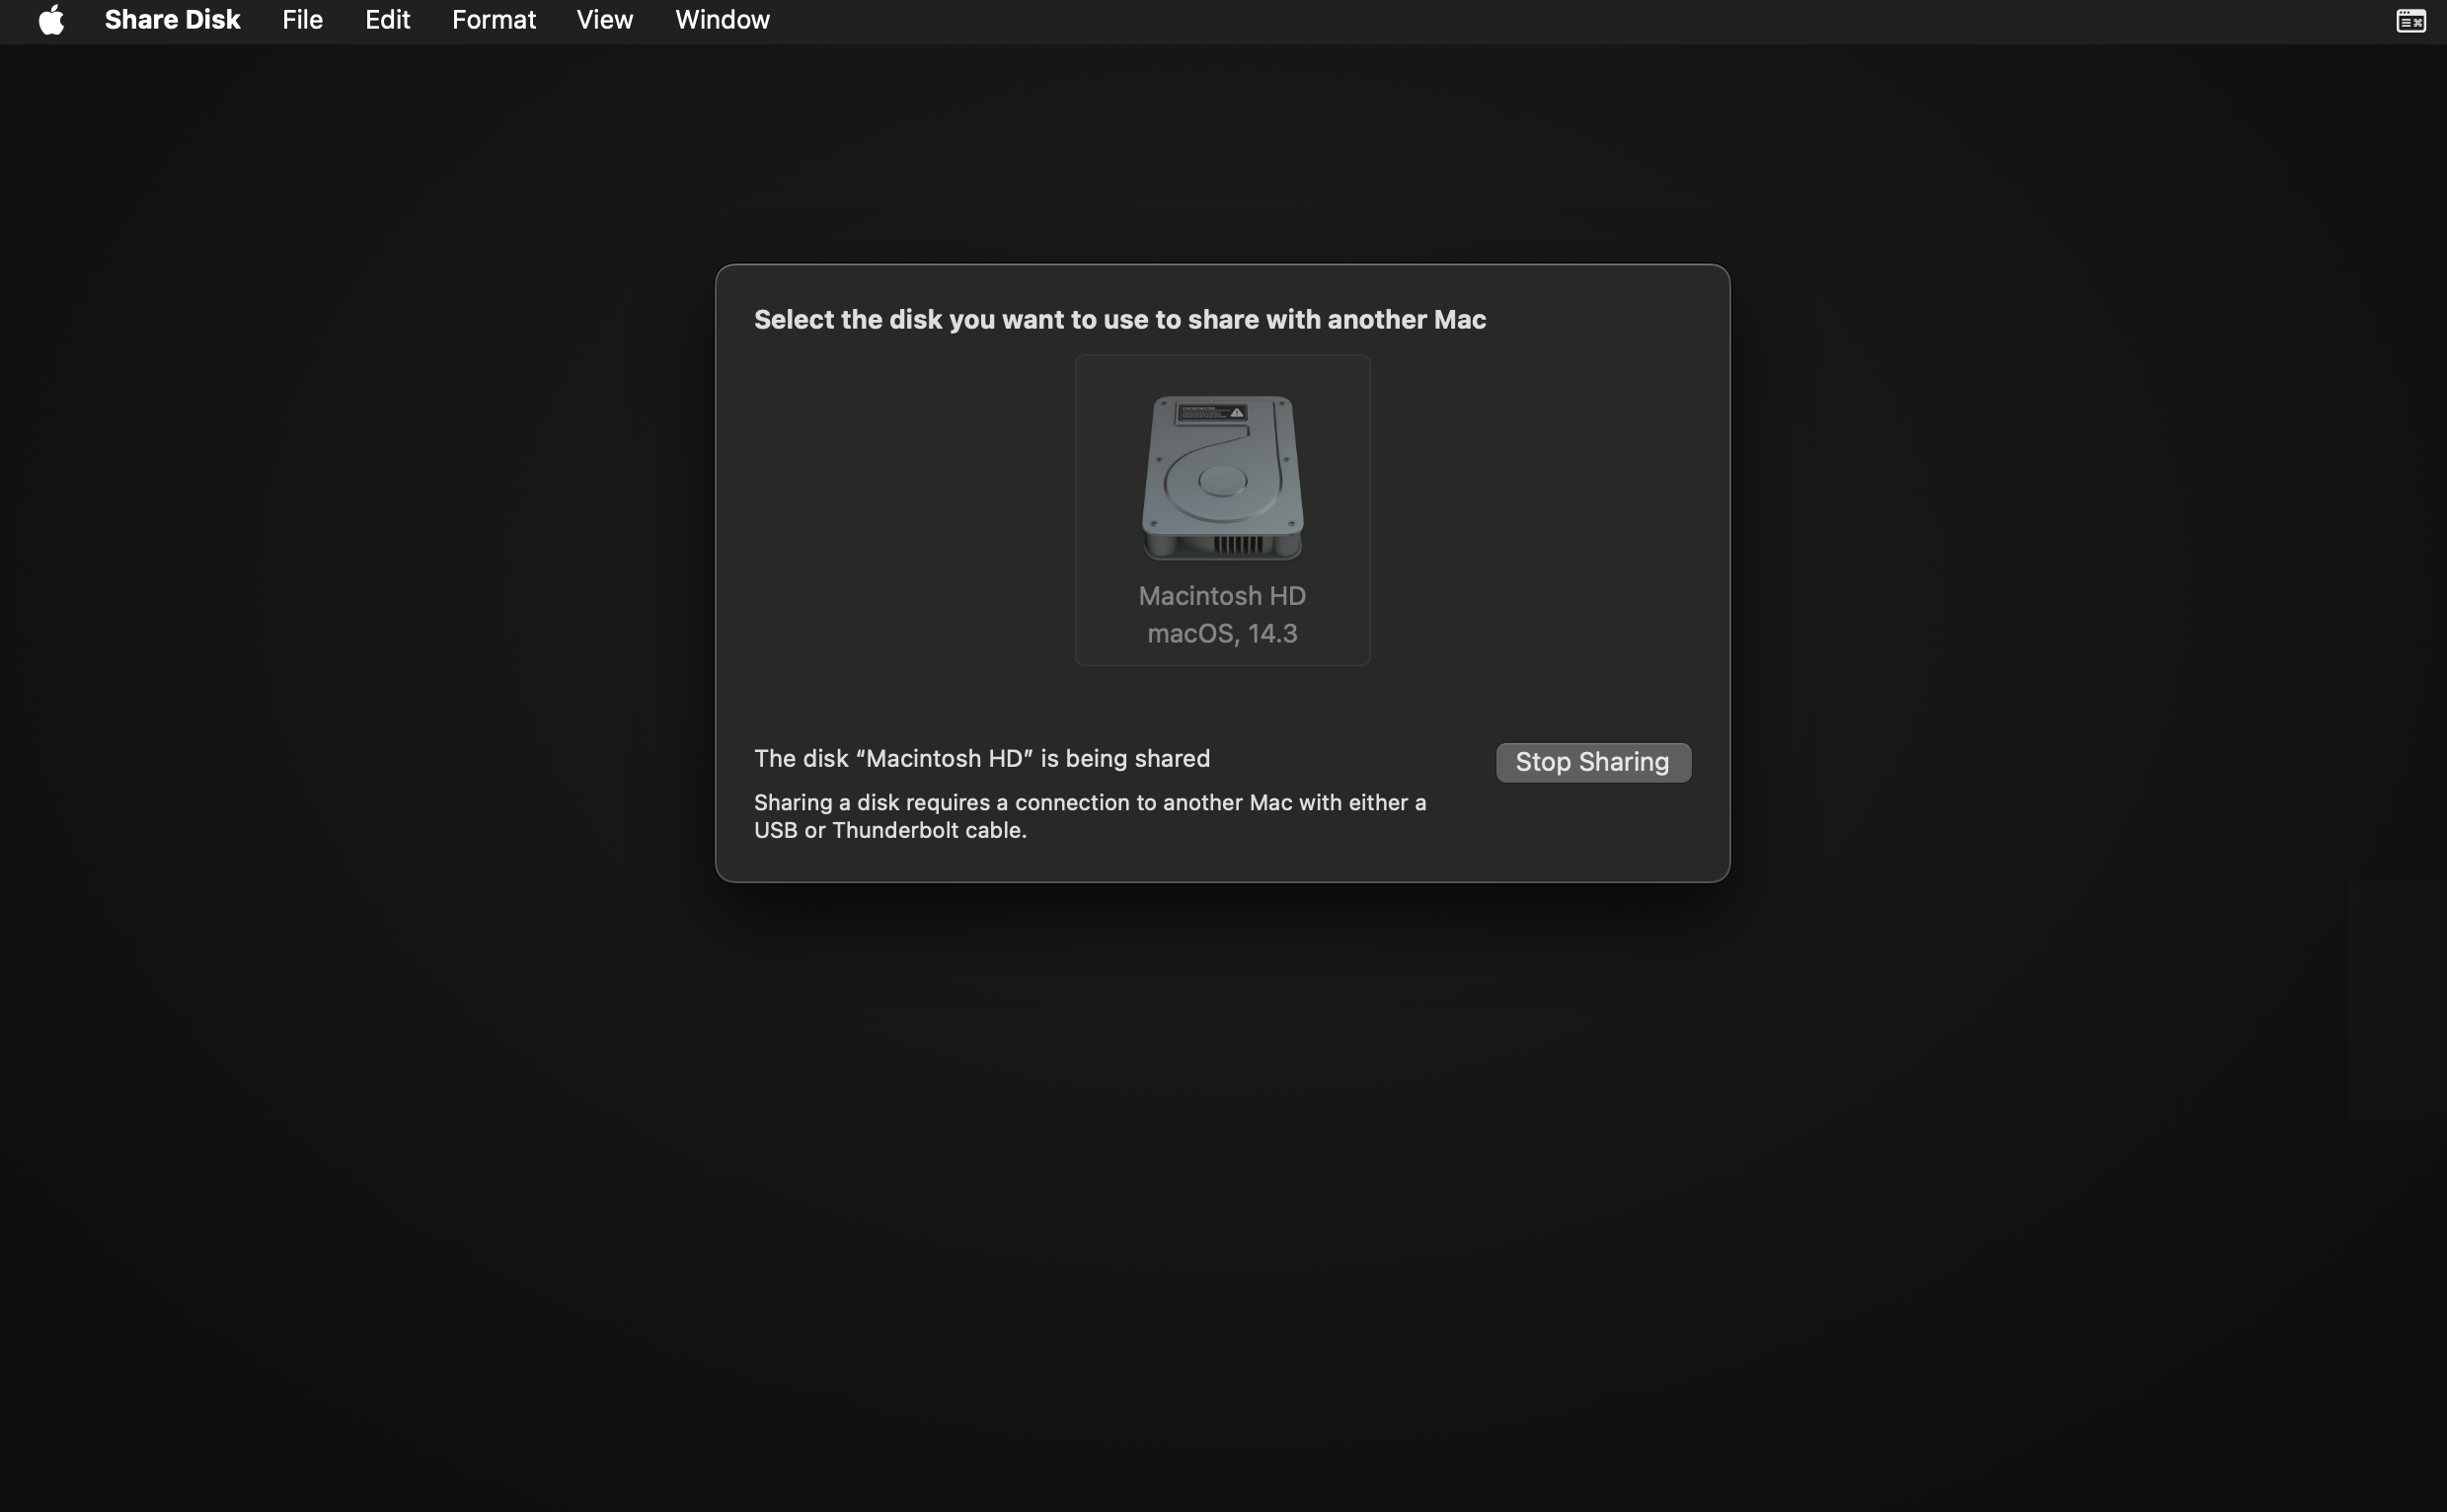
Share the disk by clicking Start Sharing.
- Ensure the host is powered on and connected to power charger, before connecting to the target. Power supply to the target should be provided only after connecting to the host (it has been experienced that an Apple Silicon Mac is not seen if it is already connected to the power supply).
-
Connect from a USB-C port on the target to a USB-C port on the host via USB or Thunderbolt 3 (TB3) cable. The host should prompt to allow accessory to connect (the setting for allowing accessories to connect can be easily changed).
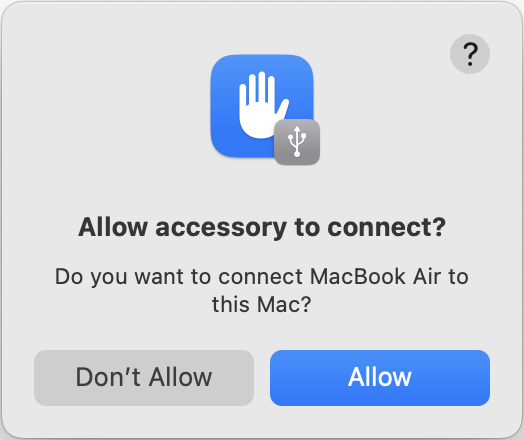
- Once connected, you should hear a sound which means that (most probably) the target is connected to the host.
- Connect the target with power supply.
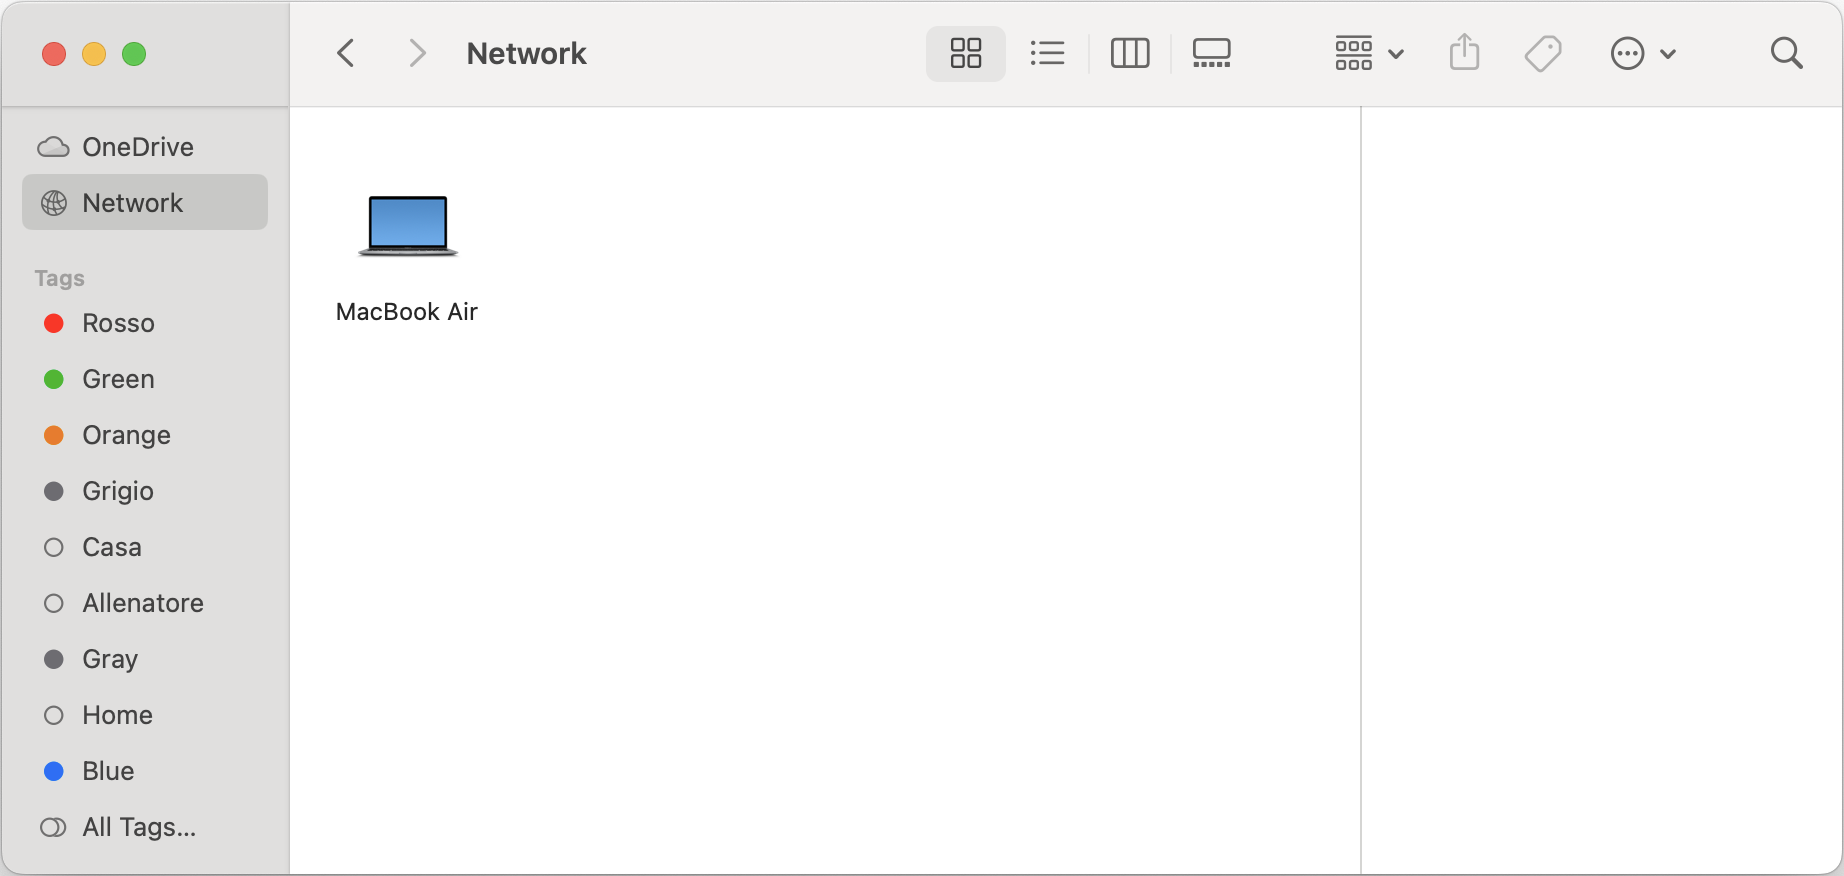
- With Finder, select Go > Network (or press SHIFT+CMD+K) and check if you see an icon with the target’s name (e.g., MacBook Air).
The screenshots of macOS Recovery have been created from a virtual machine running with UTM.
Mounting the Shared Disk on the Host
Upon establishing a connection between the target (Apple Silicon Mac) and the host (examiner’s Mac), the shared disk is not immediately accessible; it must be mounted on the host to enable data transfer.
In the manuals of many commercial forensic tools, it is reported that this can be achieved with Finder by selecting Go > Network and double clicking on the icon representing the target.
If requested, you need to enter the password to connect as a specific user to the target.
If password is not required, the host can connect to the target as the Guest user.
Connecting as Guest is an option when the target is not encrypted with FileVault.
However, double clicking on the target using Finder mounts the shared disk in read-write mode.
To ensure forensic soundness, the ASLA script provides the assisted mode (option -a) to identify the target and mount the shared disk in read-only mode on the host at a user-specified path.
The target can be easily identified using the smbutil command-line utility:
% smbutil view //Guest@MacBook%20Air._smb._tcp.local
The view verb allows to list shared resources, specifically the name of the shared disk, providing an output such as:
Share                                           Type    Comments
-------------------------------
IPC$                                            Pipe
Macintosh HD                                    Disk
After the view verb, you see that the target is specified using the pattern //<UserName>@<ComputerName>._smb._tcp.local, where <UserName> is the name of the user on the target (it can be Guest if no password is required) and <ComputerName> is the name of the target with white spaces replaced with %20.
Having username, password (if requested), computer’s name and shared disk’s name of the target, you can mount the shared disk in read-only mode on the host as follows:
% mkdir /tmp/target
% mount_smbfs -o ro //Guest@MacBook%20Air._smb._tcp.local/Macintosh%20HD /tmp/target
Similarly to the smbutil view command, the share to be mounted is specified using the pattern //<UserName>:<Password>@<ComputerName>._smb._tcp.local/<SharedDiskName>, where <Password> is the password of the user (if the password is required, otherwise : and <Password> can be omitted) and <SharedDiskName> is the same of the shared disk.
If <Password> is not provided, but it is required, the host prompts to type in the password for the specified user.
All the aforementioned commands and steps can be automatically performed with the ASLA script if it is executed in assisted mode. The following section explains how to use the ASLA script (asla.sh) for performing the logical acquisition of an Apple Silicon Mac in share disk mode, covering the assisted mode as well.
Run the script to perform the logical acquisition
To get started with ASLA, you just need to perform the following steps:
- Download the
asla.shscript from this repository or clone it to your Mac device. - Ensure that the script has executable permissions:
% git clone https://github.com/giuseppetotaro/asla % cd asla % chmod +x ./asla.sh - Run the script:
% ./asla.sh [OPTION]... TARGET DESTINATIONwhere
TARGETandDESTINATIONare, respectively, the paths to the mount point of the target’s shared disk and the location (preferably external) where the acquisition will be saved. - Follow on-screen instructions if executed in assisted mode, which will guide you through the acquisition process.
- Once the acquisition process is complete, the script will provide a summary of the operation and the location of the acquired data.
The asla.sh script offers a concise but effective help message using the -h option as follows:
% ./asla.sh -h
The help message provides all the options available:
  -h, --help                 print this help message
  -a, --assisted             run the script in assisted mode
  -c, --calculate-hash       calculate MD5 and SHA1 hashes of the sparse image
  -i, --image-name <name>    name of the sparse image (without extension)
  -n, --name <name>          computer name of the target (only in assisted mode)
      --no-password          no password will be used (only in assisted mode)
  -p, --password <password>  password of the target (only in assisted mode)
  -s, --size <number>        size of the sparse image in KB, otherwise it will
                             be calculated based on the size of the target
  -t, --tool <cp|rsync>      tool for the acquisition (cp is the default)
  -u, --user <name>          username of the target (only in assisted mode)
Let’s see how to use asla.sh with some examples.
Assuming that the shared disk of the target is already mounted (for instance, by using the mount_smbfs command) on /Volumes/ShareDisk and the destination of the logical acquisition as well as the log files is /Volumes/ExternalDrive, running asla.sh on the host as follows performs the logical acquisition of the shared disk of the target:
% ./asla.sh /Volumes/ShareDisk /Volumes/ExternalDrive
However, mounting the shared disk in read-only mode might be a cumbersome process.
Therefore, asla.sh can be executed in assisted mode ith the -a option, facilitating the whole acquisition process:
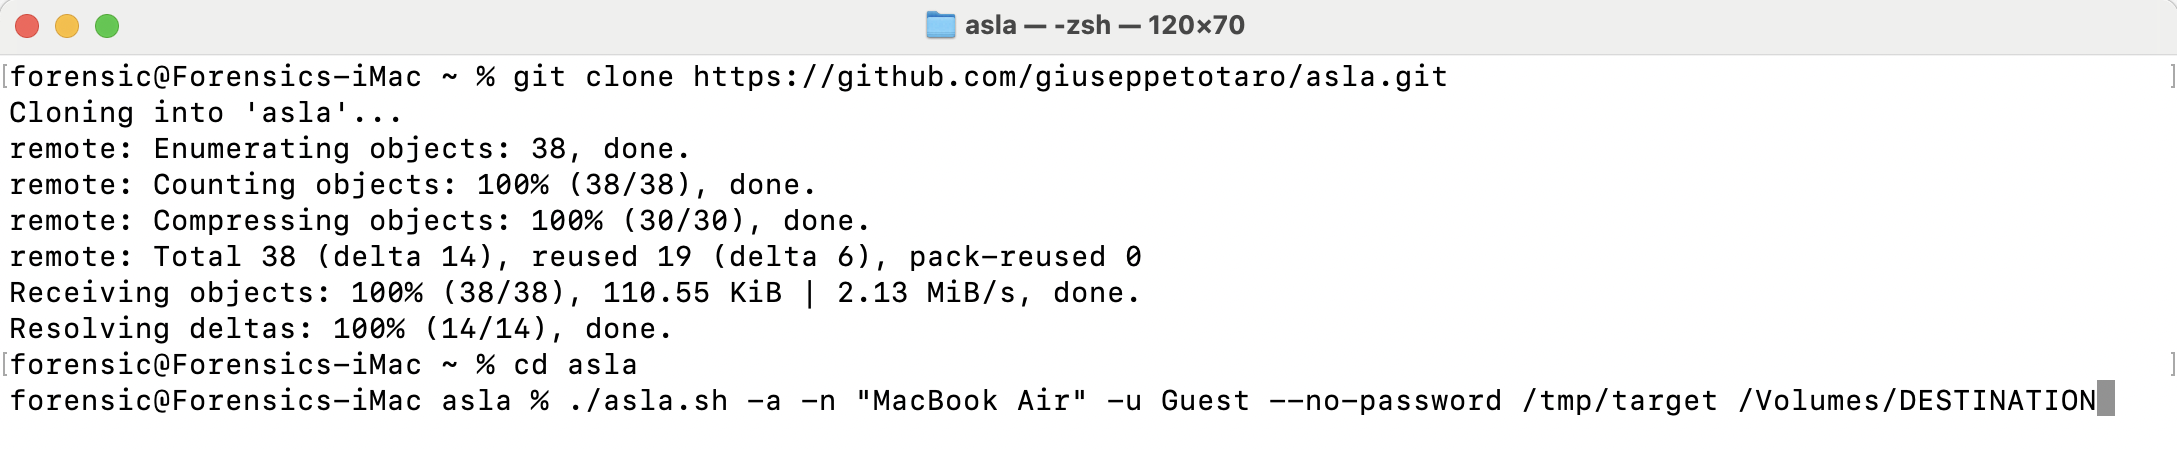
% ./asla.sh -a /tmp/target /Volumes/ExternalDrive
When running in assisted mode, asla.sh normally prompts to request computer’s name, username and password (if requested) of the target, unless these information are provided with the options -n, -u and -p (not necessarily to be used all together) to automate the assisted mode as well:
% ./asla.sh -a -n "MacBook Air" -u user -p password /tmp/target /Volumes/Dest
If the password is not needed, the --no-password option should be used.
By default, asla.sh creates within the destination folder a sparse image named as ACQUISITION.sparseimage.
This sparse image is automatically attached and will contain the files of the logical acquisition, to preserve data and metadata within a disk image which can be detached and attached on another systems for further processing.
The size of this image is automatically determined while executing asla.sh. However, the name and the size of the sparse image can be provided by the user as well as the option to calculate MD5 and SHA1 hashes of the image at the end of the logical acquisition process, with the options -i, -s and -c respectively:
./asla.sh -i MyAcquisition -s 500 -c /Volumes/ShareDisk /Volumes/Dest
Obviously, the most important operation is the copy of file contents from the target to the host, which with asla.sh can be performed relying on either cp or rsync, in both cases executed to preserve file attributes and metadata.
By default, cp is the command-line tool used for the logical acquisition, but rsync can be selected with the -t option:
./asla.sh -t rsync /Volumes/ShareDisk /Volumes/ExternalDrive
Here is an example of how to start with ASLA, run asla.sh to perform the logical acquisition of an Apple Silicon MacBook Air (no password required in this example) and what kind of output is displayed when running the script.
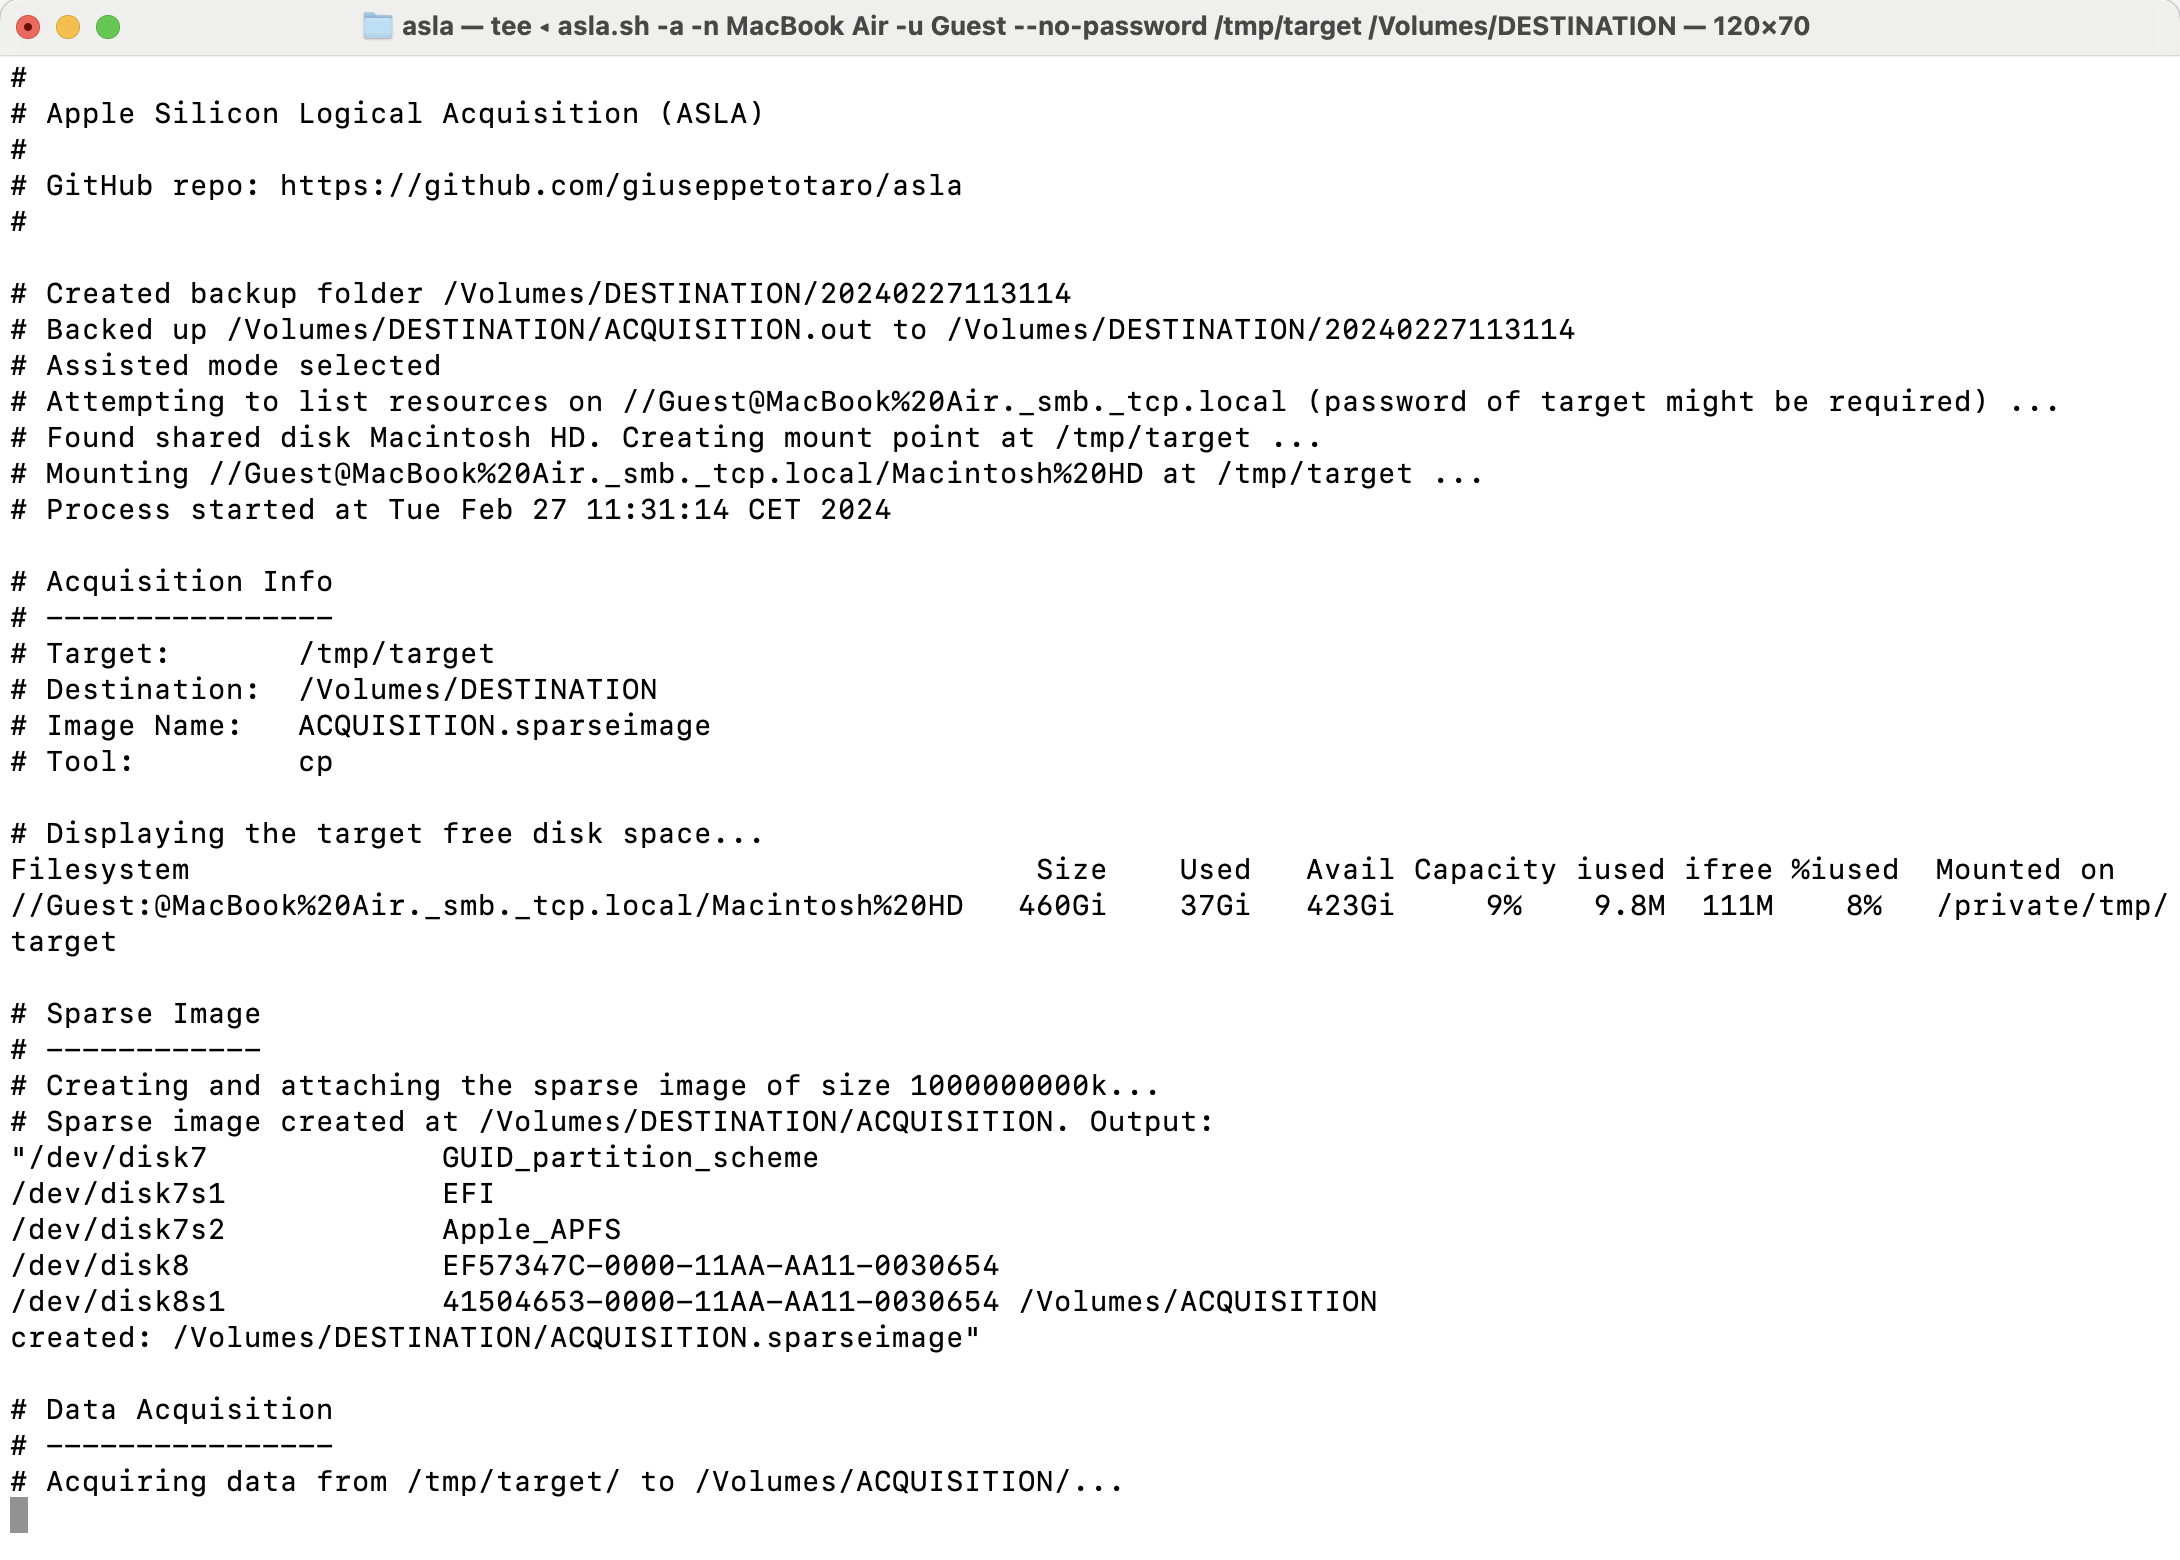
In addition to the sparse image (by default, named as ACQUISITION.sparseimage) containing the logical acquisition, once asla.sh has completed the following plain-text files are created in the same destination folder:
ACQUISITION.out(or other name used as image name with the.outextension) containing the output ofasla.shas well as the summary of the logical acquistion process.ACQUISITION.log(or other name used as image name with the.logextension) containing the list of files copied with the command-line tool (cporrsync) used to copy the files from the target.ACQUISITION.err(or other name used as image name with the.errextension) containing the list of errors occurred while copying from the target.
Best Practices and Considerations
The use of asla.sh can facilitate the logical acquisition of an Apple Silicon Mac in a forensically-sound manner.
It is also recommended to perform the logical acquisition according to the following best practices:
- Use external storage as a destination, to avoid taking too much disk space on the host or risking errors for insufficient space. In my experience with Mac forensics, it is better to use storage based on HFS+.
- To prevent the host system from sleeping while performing the logical acquisition, you can use the
caffeinatecommand-line tool:% caffeinate -d -i ./asla.sh [OPTION]... TARGET DESTINATIONwhere
-dand-icreate assertions to prevent the display from sleeping and the system from idle sleeping, respectively, for the duration ofasla.shexecution. - It is recommended to disable Spotlight indexing on all the volumes with
mdutil -a -i offwhile performing the acquisition.
As a final consideration, the acquisition process should be executed on the host to ensure forensic soundness. You can logically acquire the files running an acquisition tool directly on the target (assuming that you can log in), but this might be too invasive and used only when dealing with live forensics on Mac devices.
Future Developments and Conclusion
There is already the plan to add to ASLA the following features:
- Detailed reporting of the logical acquisition
- Detailed information about the progress during the execution
- Possibility to enable filters to exclude contents from the target
More documentation, examples and how to contribute are available at the GitHub repository of ASLA. I hope you can contribute with feedback for new features.
In conclusion, the ASLA (Apple Silicon Logical Acquisition) script stands as a comprehensive tool for performing forensically sound logical acquisitions of Apple Silicon Mac devices. Moreover, beyond its practical utility, the script serves as an educational resource, guiding users through the intricacies of logical acquisition and providing insights into manual acquisition methods. Whether used as a tool for efficient data acquisition or as a learning resource for forensic procedures, the ASLA script represents a valuable tool when dealing with Mac forensics.